Friday, April 27, 2007

Pattern review

Since I'm lazy, I've just reposted the review of Simplicity 3893 that I wrote for patternreview.com . I haven't worn the top yet but I might wear it tomorrow at a get-together with my sewing friends. I'm going to see how it looks over a long-sleeved pink top. The weather tomorrow should be fairly hot but the gathering is in SF, where it will most likely be cooler.

Pattern Description:
Loose fitting top for wovens or knits. I made view C. There are only four pieces: two for the top and two for the "skirt." There's also elastic that goes in a casing below the bust.

Pattern Sizing:
Two groupings: 10-18 and 20-28. I made up the size 18 with no adjustments.

Did it look like the photo/drawing on the pattern envelope once you were done sewing with it?
It came out pretty much as expected, based on the drawing. You'll most likely want to wear this with a shirt or camisole underneath as the "V" is very low.

Were the instructions easy to follow?
The sewing instructions were just fine; however, I did deviate from them to use some of my own methods for working with knits.

Since I was sewing with a knit, I used a lot of fusible straight-grain seam tape (I used Design Plus). I used the seam tape to stabilize the long shoulder seams, the front neck edge, and also the bottom hem, since the hem was on the more stretchy, crosswise grain.

Instead of using bias tape to finish the neckline, I turned to the book Sewing with Knits by Connie Long and used her directions for sewing a simple knit neckline. I cut a 1 1/4 inch strip from the lengthwise grain of my fabric. I figured the lengthwise grain had just enough give to curve around the back neck but was stable enough for the front "V." I sewed the trim to the neck edge, right sides together, trimmed the seam allowance to 1/4 inch, and then turned the strip over the seam allowances and stitched it down. For the sleeve and bottom hems, I used the coverstitch on my serger. Side seams and the casing were done with a small zig-zag stitch.

What did you particularly like or dislike about the pattern?
I don't like where the sleeves hit my arms. In hindsight I should have made the longer sleeves. Also, the front elastic band wants to ride up higher in the front than the back. I don't know if this is the way it should look or if it's just the way it fits my body.

Fabric Used:
A thin, 2-way knit from Emmaonesock. I love the design on it but the color makes me look a bit washed out, which of course would be the case no matter what I made with it. However, the weight of the fabric is just right, I think and makes the top light and flowing.

Pattern Alterations or any design changes you made:
I didn't alter the pattern and only changed how I constructed it.

Would you sew it again? Would you recommend it to others?
I might make it again but I have a lot of patterns for cute summer tops in my stash!

Conclusion
This is an easy top that could certainly be sewn by a beginner, especially since the sleeves are one piece. It's forgiving in the way it fits, which is also good for beginners.

Wednesday, April 25, 2007

Grandma's sugar cookie recipe

1 cup (2 sticks) of butter*
2 cups sugar
3 eggs
1 tsp vanilla
1 tsp baking soda mixed into
1 cup of sour cream (light is ok)
½ tsp salt
¼ tsp nutmeg
1+ tsp baking powder
4 cups flour

Oven temp is 375°F
Baking time is about 10 minutes, but you should adjust that up or down as needed.

*original recipe calls for 1 cup of shortening or ½ cup shortening and 1 stick (½ cup) of margarine, but I don’t bake with shortening anymore and we prefer butter over margarine.

There are no instructions on which to mix first, but you can pretty much figure it out if you bake. I cream the butter and sugar, add the eggs one at a time, then add the vanilla. Next I put in the sour cream with the baking soda added to it. Into one of the cups of flour, I add the salt, nutmeg and baking powder. Then I slowly add all the flour to the butter/sugar/egg/sour cream mixture. The dough will still be sticky. The original recipe said to use part of the 4th cup for rolling but I’ve never been able to accomplish that. I end up using more flour, as much as needed to get the consistency to where I can roll and cut the cookies. Refrigerating the dough helps some.

My technique for rolling and cutting the cookies is to take out half of the dough and add flour until I can work it. But don’t go overboard with the flour. You want to get the dough to where you can just lift the cookies off the surface. Often, the cookies cut from the edges will come up easier than those in the middle, so go ahead and cut those and rework the center dough with a little more flour for the next go-around.

I make these primarily at Christmas, so I sprinkle colored sugar on them before baking. This last time I made them I wanted to try icing, so I baked them first. I chose to use meringue powder instead of egg whites, which would end up raw in the icing. Since these were for a gathering with other people, I didn’t want to take any risks. I went to a specialty grocery store to find the meringue powder and found that Wilton’s makes it, so you could try the cake decorating area of a craft supply store. The icing recipe from Wilton’s is:

3 tbsp meringue powder
4 cups powdered sugar
6 tbsp water

Photos!

Although I didn't bring my camera to Chez Spinnity for the spin-in on Saturday, J (theknitistKnit Flix) had hers and captured some pics for posterity. There's even a picture of my first singles! Nathania brought the super-portable Louet Victoria wheel, which I'm now lusting after. The day was full of goodness: spinning, friends, food. I made sheep cookies using my grandmother's sugar cookie recipe and some royal icing.

(click all pictures to get larger ones)


It was my first time icing cookies and I don't think I'll icing cookies very often. Too much work! But the cookies seemed to be a hit with my friends. I created a menagerie with the rest of the dough. I used some Williams-Sonoma cookie cutters that are lovely but good grief, most of the animals had skinny legs and/or tails and it was a challenge to cut them out. Maybe these cutters will work better with a flatter, more dense cookie dough. My grandma's recipe results in dough that is quite soft, but the cookies are slightly cake-like and I love them. Here's some of the menagerie pre-icing:


Here are the decorated hippos I made just for my husband. I thought they were a bit drab all in gray and needed some multi-colored sprinkles.


While I was off spinning, my husband planted a vegetable garden. There's quite a bit planted in the beds: lettuce, hot peppers, sweet peppers, cucumbers, basil, tomatoes, corn, onions, yellow squash, zucchini, pumpkins, cantaloupe, eggplant, and beans. Whew! I've probably forgotten one or two (peas, a potato plant, more tomatoes, and an artichoke are growing on the other side of the yard). For some things we only planted one plant and for others there are six transplants. I don't expect everything to do well and I've recorded what's planted where in a Gardener's Journal so I can note what works and what doesn't. We've grown vegetables before, mostly from seed, but work on the interior of the house took us out of the garden. Hopefully it will be a good growing year and we won't have the heat waves we had last year. Behind the vegetable beds in the picture are some of our fruit trees. I'm calling this our mini-orchard, although we have many more fruit trees throughout the yard. In this patch, there are two small apple trees, a Meyer lemon tree and two peach trees. There are also blackberry canes that you can just barely see off to the left and my husband planted some new raspberry canes but they're little and you can't see them.


In the rest of the yard we have: plum, almond, apricot, pear, fig, blueberry, orange, tangerine, lime, grapes, cherry, and strawberries. The plum, apricot, peach, and pear trees provide enough for canning, the orange and lemon provide us with juice and the rest provide just enough for a tasty treat. We don't have a large lot. It's only a 6000 sq ft lot and the house takes up about 1/4 of that. I can only imagine what we'd do with a larger yard!

There's still more work to do on the vegetable bed side of the yard. We are going to put gravel between the beds, stone pathways, some decorative plantings, and an arbor to hide the view of our backyard neighbor's house (if only it could sound-proof it too!)

Here's a view of the rest of the back yard. Note the hippo in the pond.

And last, but not least, a (not so great) picture of the completed Simplicity 3893 top. The review, and maybe a better picture, will have to wait for another day.

Monday, April 16, 2007

Busy bee

I've been busy doing lots of stuff but haven't made time to photograph my projects. Words will have to do for now.

1. Simplicity top (3893)
It's done. It's been done for a week now and has been adorning my dressform ever since. I'm not 100% happy with the results. I chose the shorter sleeve version and now wish I'd made the sleeves longer. I have fat arms and the sleeves are voluminous and stop at the fattest part of my upper arm. Not good. Added to this, the fabric color is not very attractive on me - it's too close to my skin tone and I look washed out. Since it's a low cut top and (I believe) intended to wear over something else, I may see how it looks over a long-sleeved pink top I have. I'm hoping the darker pink will bring in more color and the sleeves will look better layered over the longer sleeves. If it doesn't, then I'll just wear the top under a sweater, which is how I often end up wearing short sleeve tops in the summer because the air conditioning in my office often makes it too cool for me.

2. More sewing
I cut out and sewed up a muslin of the boat-neck version of Jalie 2005. I made the v-neck version before but in a stretchier fabric so I tried a larger size. But the test top was still too tight. Now that I look at the picture, I was thinner then too, which explains why I have to go up yet one more size. I really should get back to the gym. My fat arms could also use a workout.

3. Socks (not the husband-socks)
I put the husband-socks on hold for a bit because I'm almost to the heel and need to measure. There's no rush because my husband won't be wearing them until next winter anyway. So I started a different pair...for me. I picked up three hanks of Socks that Rock at Purlescence a week or so ago. For you non-knitters, Socks that Rock is a wonderful sock yarn by Blue Moon Fibers that can be a bit hard to come by because it's so wonderful. I'd received an email notice that Purlescence just got a new shipment and I just had to have some. One of the colorways I chose is called Little Bunny Foo Foo. I immediately started the Knitty.com sock pattern Monkey because I couldn't wait to see the pattern of colors that would emerge from this yarn. I'm loving it! I turned the heel but realized that I stitched a row or two too many on the heel flap so I might have to rip back, otherwise the instep might be too big. Also, I was incorrect in my last post about not having to block socks. Monkey is a lace pattern and will require blocking, I think.

4. Bonita
I haven't forgotten about Bonita. Now that I'm at a sticky point with the socks, I've turned my attention back to this summer top. The front is almost finished - just a few more rows and then I'll start knitting the back.

5. Backyard project
My husband and I have been working on the backyard for a few weeks now. The yard has been a work in progress ever since we moved in over 9 years ago, but we recently stepped it up a notch in hopes of finally "finishing" it. The yard is not very large, about 25 feet deep and I think less than 100 feet wide. When we moved in, the yard consisted of mostly concrete, some grass, and a wood structure over the patio area that was painted black and covered in a hideous, filthy, green plastic. Years ago we removed most of the concrete and put pavers over a smaller, patio section. We tore down the old structure and put up a redwood pergola with trellises for climbing plants. We also put in a pond with a waterfall, planted many fruit trees, and tried our hand at raised-bed vegetable gardening. But we never finished the landscaping and a sizable area was left to the weeds. The nice thing about DIY as opposed to hiring a landscaper is that the design of the yard has changed as we have changed. At one time we were going to put in grass and a sprinkler system but we've both concluded that we'd rather use the water to grow stuff to eat. We currently have over a dozen fruit trees and bushes already, so we decided to put four four-foot square raised beds in the center of the yard (the half that's not taken up by the patio and pond) and have paths and small plantings take up the rest of the space. The vegetable beds will look a lot like this kit, available through Gardener's Supply for $1150, if you're interested.

It's the exact design I'd had in mind long before I saw this picture, but the picture helped my husband visualize what I hadn't put to paper and it got us to work on it too. Ours will not have as much gravel, nor will there be grass around it. There won't be any copper caps on the posts either. We built our boxes out of redwood (theirs are cedar) for about $40 each and although the home supply store had copper caps, they were $10 each and I just couldn't see spending another $40 per box just for caps. I like the copper solar birdbath, but not the $225 price tag. I had planned to turn a tall, four-sided ceramic vase into a fountain and use that in the center, but the vase we purchased looked out of scale with our boxes, so we've decided to use it somewhere else in the yard. I'm thinking a sun dial might be nice instead. We'll also build trellises similar to the ones in the picture. Gardener's Supply also a great cucumber trellis that would be easy to make.

Wednesday, April 04, 2007

Socks, socks, socks

Socks, socks, socks. It seems everyone is knitting socks. I like to knit them too. But I got to thinking, just what is the attraction to knitting socks?

Socks don't use a lot of yarn
A typical pair of socks uses about 100 grams of yarn. This makes socks more economical to knit. I know some people think knitters are nuts to spend upwards of $20 (or more!) on yarn for socks, but it's much more economical to knit socks as opposed to sweaters. Socks take about 100 grams of fingering weight yarn with about 150-200 yards per 50 grams. A sweater takes around 1200 to 2500 yards, depending on the type of yarn, style of sweater, and of course the size. A typical 50 gram ball of dk or worsted weight has about 100-150 yards, and at $8-10 ball you're looking at an average cost of $150 to knit a sweater. I don't know about you, but that sweater's got to be worth it.

Socks are an excuse to buy nice yarn
Since you don't have to commit a large chunk of cash to the project, you can knit with some nice yarn and some really fun colorways.

Don't need another room to store your sock yarn
Another benefit of socks not using a lot of yarn is that the stash you accumulate for socks doesn't take up as much room. I feel much less stash-guilt having 1 container storing 10 sock projects than 10 containers storing 10 sweater projects.

Socks are fast
Relatively speaking, socks are fast to knit. Since they use less yarn, they are therefore faster to knit than a sweater. There is a place for sweater knitting and sometimes I like the monotony of the long stretch of knitting for the front or back but often by the time I finish those I'm bored with it and not looking forward to knitting the sleeves. I could knit only vests and sleeveless sweaters, but I don't wear too many of those so there'd be no point in knitting them. The only downfall with socks is that sometimes after knitting one, you aren't interested in knitting the second - this is termed "second sock syndrome." Some people overcome this by knitting both socks at the same time on circulars or just getting into the habit of casting on the second sock right after finishing the first. Frankly I find "second sock syndrome" no more of a problem than being on "sleeve island." I don't know who first coined that term, but it seems to fit the feeling one gets when you just want the sweater finished and you have those sleeves yet to knit and you're thinking maybe sleeveless is the way to go.

Opportunity to use new stitch patterns
There are lots and lots of sock patterns out there now and much of the difference between them is the stitch pattern. Socks are a really great way to knit some fun stitch patterns without having to commit to a big project.

I wear socks
Scarves also don't use a lot of yarn and are therefore more economical, a way to knit with some really nice yarn, fast, and can employ lots and lots of fun stitch patterns. But how many scarves can a person wear, especially if you live in a warm climate? I could pretend I'm French and wear fashionable scarves but I don't particularly like knitting with novelty yarns and I already have enough silk scarves in my wardrobe to wear a different one every day of the week.

Socks are more portable projects
I enjoy knitting to pass the time in doctor's office waiting rooms, while riding in the car (riding, not driving!), or on the airplane. Who wants to lug around a big sweater or blanket? I knit almost constantly while flying, it keeps my fidgeting in check and passes the time, but carry-on space...and seat width...is limited. A sock project is perfect.

Socks are easy
They are easy, they really are! Knitting in the round on double-point needles (dpns) only looks difficult, and perhaps dangerous to the non-knitter - all those pointy needles in your hands. But it's just knitting in the round: you knit on one needle, then the next, then the next, and so on, going around in a circle. The only tricky part is making sure you don't leave a gap between needles and this isn't a big deal if you're knitting with a "grippy" yarn, like wool. A basic top-down sock consists of a few inches of ribbing, some more inches of stockinette or any other pattern you fancy, the heel and gusset, some more inches of stockinette for the foot, decreasing for the toe, binding off and joining. Ok, so I glossed over the heel and gusset. I've only knit two pair of socks so far and I just followed the directions and lo and behold I created a heel and gusset (the part that connects the heel to the foot of the sock). It's really not that hard.

No seaming!
Well, almost no seaming. If you knit top-down socks, you need to seam the toe. But I just finished some sweaters and if they hadn't been gifts I might not have finished them. All the seaming! Shoulders, sleeves, side seams, plackets... All those ends to weave in!

No blocking!
I just finished some typical sweaters that each had front and back pieces and two sleeves. These pieces all had to be blocked so they'd lie flat and be the correct size. I crossed my fingers and cheered when they measured up. I'm not so lucky on another sweater I knit. The front and back don't resemble each other in width or length. I'm sure knitting them over an 8 year period had something to do with this. There will be a future blog entry to show this mess of a sweater.

Hand knit socks are great to wear
Before I finished my first pair, I was skeptical. How great would they be? But I have found my hand-knit socks very comfortable. I also like to show them off. They're one of a kind! And the sock yarn you can buy is just gorgeous...or just plain fun. I found self-striping and patterning yarn to be almost magical and some of the hand-dyed yarn colors are just delicious.

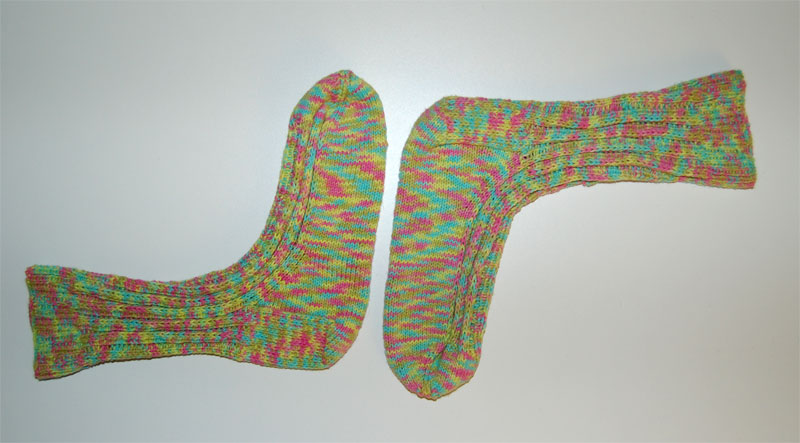
The first pair of socks I knit:


So why do you knit socks?

Tuesday, April 03, 2007

Progress stopped by the foot control

Last night I cut out the Simplicity top - 4 pieces and pretty simple ones too. I set up my serger (a Babylock Evolve) to start sewing and brrrrrrrrrrrrrrrrrr the foot control appeared to be stuck on one speed - fast! This is actually a replacement foot control because a year or so ago my serger seemed to "race" in speed, going fast, slow, and then fast again. I took the serger to the dealer but the serger itself was fine (thank goodness) so they replaced the foot control, which seemed to fix the problem. But now it's doing it again. My husband suspects it's because I leave the machine plugged into the power strip all the time. But it's more likely that cat hair mixed with fiber dust that probably accumulates on the floor accumulated inside the foot control. I say probably because the floor is not visibly dirty. But neither is our house and every day Roomba sweeps and comes back with a dust bin full of hair and mystery fluff. The sewing room is off limits to Roomba because of a fringed rug in the room, so the cat hair, fiber, and mystery fluff doesn't get picked up very often. My husband used his air compressor to try to blow out any debris in the foot control. Unfortunately the control is not made to come apart so he couldn't do a thorough job. I really hate manufactured things that are sealed so that you can't open them up to fix them when they break. Often you have no choice but to replace things and leave the broken item to rot in a dump somewhere for the next million years. I don't like to send things to the dump and I don't like paying money to replace things that are fixable. Anyway, the compressed air seemed to help. I tried out the foot pedal and it alternated between normal and fast but there's hope I will be able to serge at a normal speed, perhaps with another shot of compressed air. But by then it was too late at night for sewing so I will revisit the Simplicity top on another day and hopefully not have a temperamental foot control.

And now to change the subject. We visited the Monterey Bay Aquarium two weeks ago and I brought my camera with me. Click here to see some more photos.

Drifting

Monday, April 02, 2007

Past, present, and future

Finished

The "niece" sweaters are on their way to my nieces. Here's a picture of the finished doll outfit (click for bigger):

In work

I've made some progress on the Burda jacket but decided to put it aside so I can work on some things for warmer weather. I always seem to be behind by a season with my sewing projects and since there's no deadline for this jacket, I think it's best to leave it be until August or September. Here's the jacket so far - the zipper is the next thing to do (the jacket doesn't have two collars, the upper and lower pieces aren't sewn together yet):


Next

So instead of the jacket, I plan to work on a summer top. I think I'll make the short sleeve version (view c), shown in the bottom right view, using the Emmaonesock fabric on the right. I plan to use the white fabric on the left for the neckline trim, or I may just use more of the pink swirly fabric instead.

Happy Birthday, Kitties!

Since we don't know the exact birth dates of our kitties (they're all adopted), we celebrate their birthdays on April 1.

Ella, the Queen, is 10 years old!


Queen Ella


Next oldest is Abby. She hides a lot so I don't get good photos of her. She's 4 5 years old.


Abby


Sergei is also 4 5 years old.


Sergei


And last, but certainly not least, is Felix. He's 3 4 years old.


Felix


Their birthday treat was catnip. Ella, Felix and Sergei crowded around me when I brought out the container. They know what it is! Abby was hiding somewhere, as usual. She eventually came out and walked nonchalantly past the other kitties who were gorging themselves on the aromatic delight. She sniffed at some and walked away and sat looking all prim and proper, as if such indulgences was beneath her. She's a strange one.