Monday, March 27, 2017

More socks

I quite like knitting socks - they're easy, portable, don't take a lot of yarn, and hand knit socks are comfortable to wear. I've knit 4 more pairs since my Sockapalooza round up of sock knitting about a year ago. Two pair are for me and two are for my husband. I also have 1 sock without a mate - I'm unsure if I like the way the sock fits and may not knit the second.

But here are the finished socks over the last year:

"Pairfect" Socks for husband
Stripey socks for husband

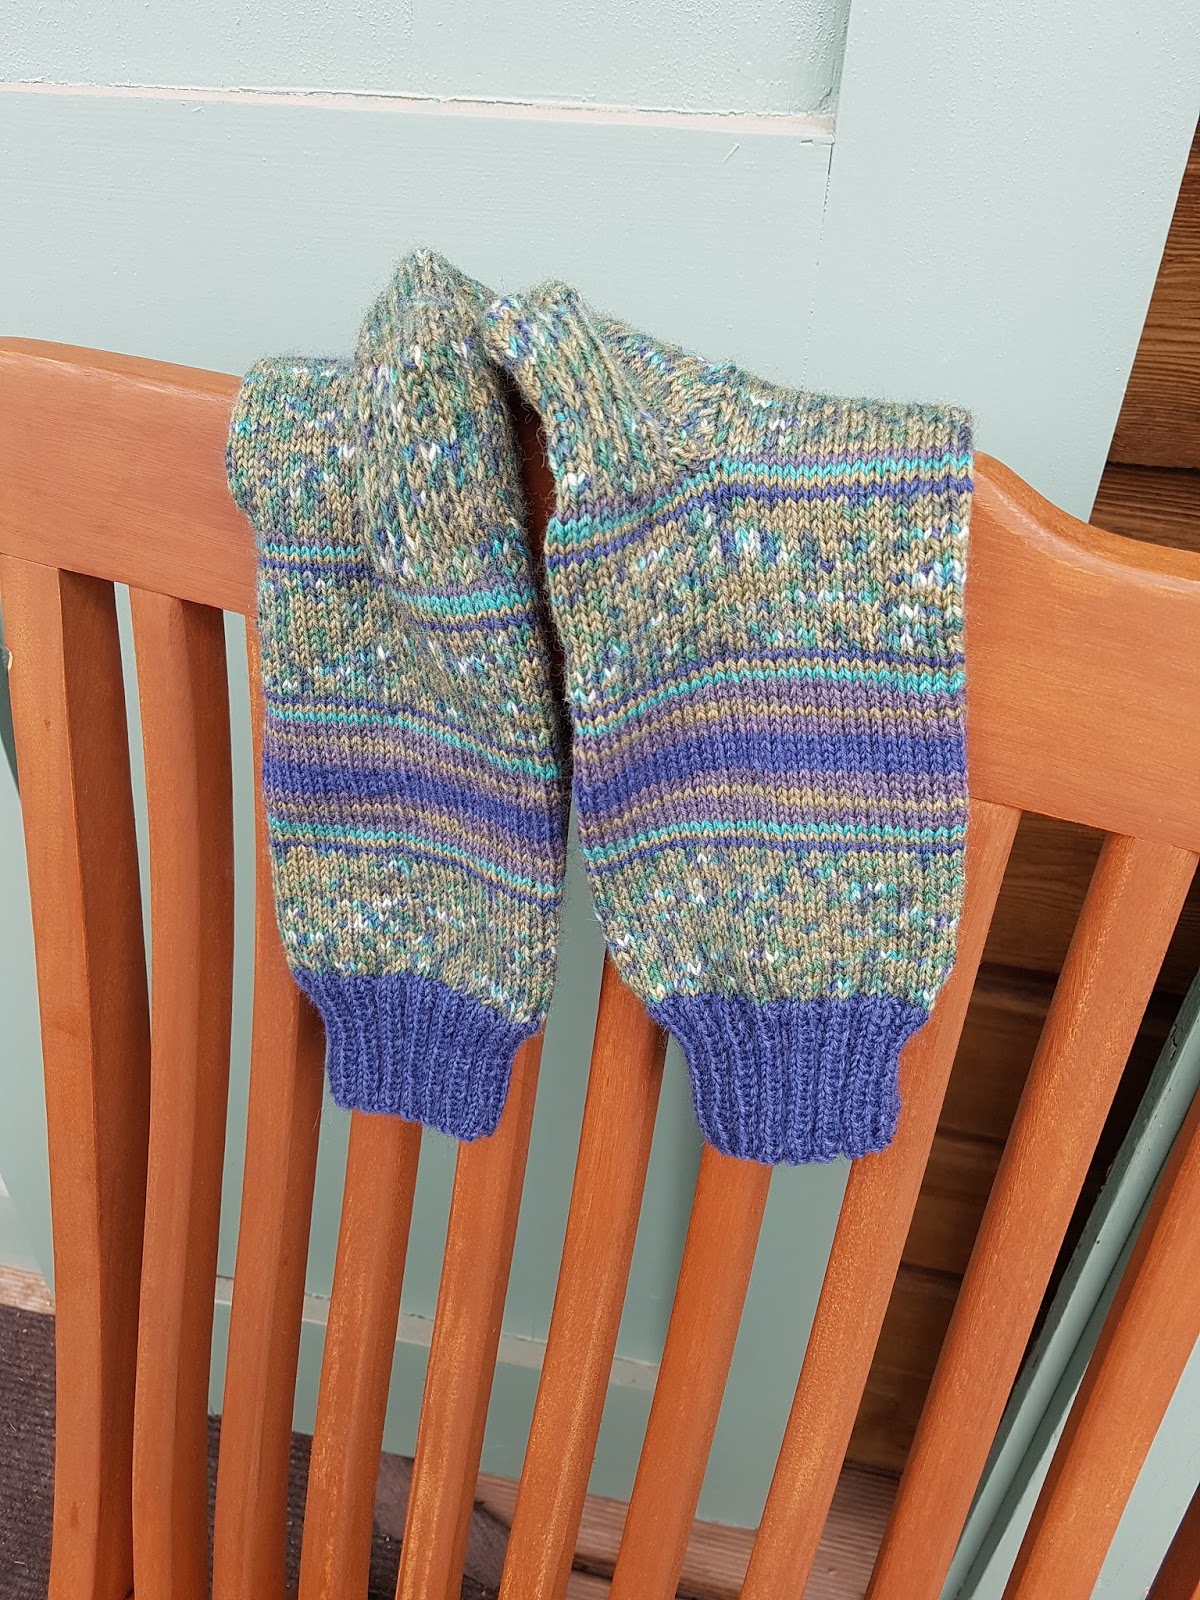
"Istanbul" socks for me

"Pairfect" socks for me
With the exception of the reddish colored Istanbul socks, all of these were knit with Regia brand sock yarn and I must say that it is hands down my favorite yarn for socks. Regia is a German sock yarn from the Schachenmayr company, which is super lucky for me because I live in Germany and I can get it for cheap at the grocery store, one aisle over from the produce. The yarn is often "last year's" selections, but we're talking 5€ (currently about $5.40) for one pair of socks (the same yarn sells for about 8-10€ elsewhere). I've tried other grocery store yarn but even though it was advertised as "super wash" and supposed to withstand machine washing, the socks I knit out of it shrank and felted when I washed them on cold (no dryer). I wash my Regia socks the same way, hang them to dry, and they're great! Now I've also knit with much more expensive sock yarns, some of which are hand-dyed and lovely to knit with and pretty to look at, but they too haven't withstood the washing machine, and they've also worn out after only a few wearings. The Regia socks are holding up much much better. I think my fancy sock yarns might become scarves and shawlettes instead.

The Istanbul socks are named because I used sock yarn I purchased in Istanbul. The yarn was actually labeled for sale in Germany because Turkey manufactures a lot of yarn for Germany, including some for Schachenmayr. The yarn I used for the Istanbul socks was a mix of wool, bamboo, and nylon. I also knit a pattern for these socks - the picture makes the socks look a bit fuzzy or even "boucle-like" but they aren't, it's just the pattern I chose. All the rest of the socks here were just knit with plain stockinette, partially because the yarn striped and I wanted the stripes to show, but mostly because plain stockinette is easy, fast, and the resulting sock is nice and smooth to wear. I like the look of socks knitted with patterns, but they're not always comfortable to wear.

The "Pairfect" socks are knit using sock yarn that Schachenmayr created to help you make matching socks. They're designed for top down knitting but you could make them toe up and get a different effect. The beginning of the ball of yarn is colored yellow and then it changes to the first color. As soon as it changes you start knitting. The first color is designed to be the ribbed top of the sock, so you just knit in rib-knit until that color runs out. Then, for this particular striping design, you knit the leg of the sock until you finish the second stripe. Then you knit the heel. The next stripe should show up after after you've finished the gusset decreases. From then on, it's just the background color and you finish the sock to the length you need it. Then you pull out the remaining yarn from the ball until the yellow leader yarn shows up. After this second yellow yarn will be the color for the cuff of your next sock, so you cast on and finish the second sock just like the first one. Perfect pairs! 

Of course you don't need special yarn to knit matching socks. I knit the stripey socks simply by looking where I started the first sock among the color changes and starting the second sock in the same place. 

So there you have it. Socks!

Thursday, March 23, 2017

A sweater vest

Yippee, a finished sweater!

What do you think?


Pattern: Cable Panel Vest by Lion Brand Yarn (free!!)
Yarn: Mission Falls 1824 Wool (discontinued) - 9 skeins used
Size: M/L
Needles used: US 6 (4 mm) and US 7 (4.5 mm)

This was a really great pattern and well written for a beginner to follow.

I bought this yarn years ago from a local (to me then) yarn store that has since closed (sad). I think I bought all they had, which was 9 skeins. I knew at the time that this would only be enough for a vest, which is what I always envisioned making. Unfortunately the yarn turned out to be troublesome. There were knotted joins in every ball. Every single ball. That was annoying because that meant twice as many ends to weave in and more yarn used. On top of that I occasionally encountered breakage in one of the four plies - I don't know whether the yarn was defective or if moths got to it (though I see no dead or alive moths or moth pieces), so sometimes I had to stop and cut the yarn and start again. I was worried that I'd run out yarn but fortunately I had just enough. Whew! And now that the sweater is done I see that the yarn is pilling already. Oh well, I still like it and hope to get a lot of wear out of it.

Saturday, March 18, 2017

Pajama party

I believe I have enough flannel pajamas to last me a while now.


I used Kwik Sew 2811, since I had good luck with it in the past. The first time I used it was in 2003 and those pajamas are threadbare so it was definitely time to retire them and make some new ones. I don't know about you, but I find it much harder to part with something I've made than with something I've bought.

I started out intending to make one pair, using the cat print flannel, but discovered that I didn't have enough fabric to make a long sleeved top. This was in November and I wanted them "now" so rather than order some fabric on line, which could take a few weeks to be shipped to my APO in Germany, I looked for flannel locally. It wasn't easy! Fortunately I found some coordinating turquoise and bought more than I needed for a long sleeved top, intending to use the pink cat print as an accent to coordinate with the cat print pants I'd already cut out and sewn up. As luck would have it, the flannel sold here in Germany is wide - the US-bought flannel from my stash was only 44 inches wide and the German flannel was about 54 inches - so I had enough for long pants as well. Then, since I had enough pink cat print for a short sleeved top, I figured, why not? Now I have mix and match flannel pajamas to last me a long time.


Wednesday, March 15, 2017

Seven muslins later...

It shouldn't be this hard...and yes, I'm a perfectionist. My goal was to make a simple top to wear under a suit jacket for a job interview. After spending hours in the store trying on every pair of black pants in my size, I had no energy or patience left for tops. I was just glad that I found some pants that fit. They needed to be hemmed, but they fit.

I searched through my pattern library and decided to make View C of Simplicity 2552, or rather the version of it published in the German magazine, Meine Nähmode.


I traced the pattern using my usual "pear shape body" alteration of transitioning from a smaller size at the top to a larger one below. That type of alteration is usually all I need when working with knits. But for wovens I anticipated that I'd need to do a "full bust adjust" (FBA). I've done an FBA before, with limited success, and unfortunately I haven't worn the garment since (maybe not because of the FBA). I tried again last summer but discovered more problems to correct on the pattern and gave up before cutting out my fabric.

I was determined this time not to give up. I needed a top to wear. But just in case, I did have a top in my closet that could do. Just in case.

So here is the saga of the seven muslins:

Muslin #1 was cut from the traced pattern just to confirm that I'd need an FBA and it did. But how much to add? I measured my bust and found I was 1 inch larger than the size I cut out, so I did 1/2" FBA and cut out muslin #2. Well, only the front. The back of the muslin was fine (almost...I did one adjustment at the back upper neck). I should title this blog post "7 muslins of the front and 1 of the back." Muslin #2 was still too snug across the front and had the tell-tale drag lines above and below the bust, indicating that there wasn't enough fabric there. Back to the cutting table. I know muslin #3 had a bigger FBA but from then until about muslin #6, I don't remember what I did, just that it wasn't working. I had to retrace the pattern a couple of times because my cut up copies could only be untaped and retaped a few times. One problem I had is that as I made the FBA larger, the darts got bigger. At one point my muslin fit if I took in the center front. This was discouraging and not right. I made an FBA to add fabric and then I have to take fabric away? Yes, the muslin fit OK if I took in the center front, but the darts were huge. So I dug out muslin #2 and tried a different approach. I had originally thought my bust point was in the right location on the pattern, but I was wrong. It was lower. I resewed the darts on muslin #2 to be lower and it fit better, still too snug, but better than it had been. I retraced the pattern, guessed on the FBA and tried on muslin #6. Almost. More FBA and some tweaking to the front neckline and muslin #7 was a winner!!! Yay!!!

All told I ended up with these pattern alterations:

  1. Cut one size for shoulder/neckline/armscye, grading out to next size below
  2. Lowered dart
  3. FBA
  4. Added 3 inches to the hem
  5. Removed from front neckline (I used the slash and rotate technique described in the this youtube video)
  6. Removed from back neckline - since this had a center back seam, I took in what I needed to at the neck and blended it into the center back seam by drawing a curved line, which works for me since I have a little hump back there anyway (too much sitting at the computer!
  7. Eliminated the zipper. The pattern calls for a side zipper but I was delighted to find that I could easily put the muslin on with no zipper. I hate side zippers anyway - they don't help me put a garment on at all, so what good are they? 
Now some pictures:
Ready to cut out


Me, with matching phone and hanger coming out of my head. A bit wrinkly because I wore it to my interview and also, it's hard to photograph yourself. 
The fabric is a rayon that I purchased a long, long, long time ago. Lets just say that at the time you could bring liquids on airplanes and greet your traveling loved ones at their gate. I bought this fabric at Louise Cutting's store in Orlando, Florida (long since closed) and probably spent what I thought at the time was a lot of money for fabric. Although I had planned to use a Louise Cutting pattern to make a top out of it, the fabric instead lived for years folded up, packed in a plastic container, weighed down by other fabrics. Then it was packed into my suitcase (or a USPS flat rate box) and traveled thousands of miles to Germany where it again spent some time folded and packed into a plastic container. I washed it in cold water, hung it up to dry, ironed it, and it came out great! Nice fabric! I can only hope all the other fabric in my stash behaves as well when I finally get around to sewing it.

Sewing up the pattern was pretty straight forward, except for the facing. Since my pattern came from a German magazine, my instructions were of course in German. My German sewing vocabulary has improved, and they reprint the illustrations (but very small) from the Simplicity instructions, but I still needed help with the facings. Youtube to the rescue again.


So I like the top. It fits. I'll probably use the pattern again, but with a few more changes. The neckline is a little too square for me and tad too high. Also, despite adding 3 inches to the pattern, I'd like it a bit longer. I sewed a 1 inch hem on this - I don't know what the pattern calls for. 

And the job interview? It went well. Hopefully I'll know something in a few weeks.