Tuesday, December 21, 2010

The sewing drought is over!

Vogue 1179

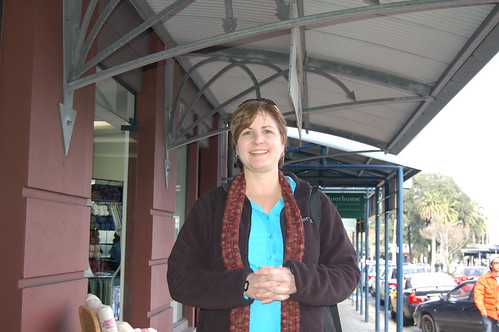
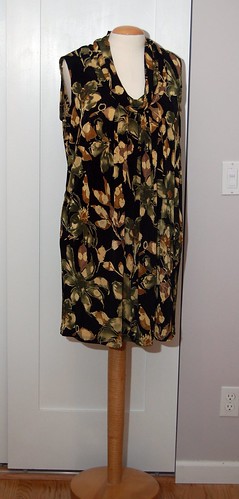
This is Vogue 1179, which I made to wear at my company Christmas party this year. It was quick to make and comfortable to wear.

Pattern Description:
Loose fitting, sleeveless dress with a cowl. It has some pleating detail in the front, is sleeveless, and is hemmed above the knee.

Pattern Sizing:
6-22

Did it look like the photo/drawing on the pattern envelope once you were done sewing with it?
Yes, I think it is pretty close to the photo and drawing.

Were the instructions easy to follow?
This is a very simple dress to construct so I think most sewers really won't need the instructions, though a beginner should not have any difficulties. The instructions are written for a conventional sewing machine, but it's easier to sew this with a serger.

What did you particularly like or dislike about the pattern?
I like that the dress is loose fitting. I was hesitant about the length being above the knee but did hem it to this length because below the knee made it look like a frumpy house-dress.

Fabric Used:
I used a slinky knit (not sure on the fiber content). The pattern calls for moderate stretch and slinky is super-stretchy so I stabilized the neckline and let it hang over night. I will not store this dress on a hanger because slinky tends to "grow."

Pattern alterations or any design changes you made:
I graded from a size 18 at the shoulder and bust to a size 20 at the waist and hip. I cut the cowl on the bias and changed the depth of the hem. I hemmed it with a 3/4 inch hem rather than 4 1/4 inches.

Other reviewers thought the armholes of this dress are high (tight), so before I cut the fabric out I compared the armhole with a sleeveless top I had that was of a similar type of fabric and found they matched pretty well, so I didn't make any changes. And considering I was using slinky I was more worried about the armholes stretching and being too large.

My construction notes
The most time consuming part of the construction was cutting out the fabric. Since the slinky was very stretchy I had to be sure to keep it flat and not let the excess fabric fall of the edge of the cutting table - something you want to avoid with any fabric, but especially knits. I also found I had to cut off the selvedges because they were pulling in the fabric and keeping it from laying flat. I used the ribs of the slinky as a guide for keeping on grain so I didn't need the edges. Also, I rarely cut out knits on the fold, especially slippery ones, so I traced off mirror images of the pattern pieces and cut out the fabric in one thickness.

I spent a lot of time fussing with getting the pleats lined up precisely but that turned out to be unnecessary. While you do baste the pleats to keep them in place, the pleats are only sewn at the top edge.

I stabilized the neck edge with a fusible straight tape rather than stay-stitching it. To ensure I did not melt my fabric I used a lower heat and a press cloth.

Like other reviewers, I sewed the cowl with one (serged) seam at the neck edge and left the raw edge, instead of sewing one edge of the cowl to the neck and then handsewing the other edge to cover the raw edge. I did experiment with the placement of the raw edge: on the inside or on the outside. Sometimes a cowl can drape so that the inside neck edge is exposed but on the outside it is covered by the cowl. In this case the inside neck edge is not visible but the cowl can shift to show the outside neck edge so that's where the nice finish should be. So, raw edge goes on the inside.

I used a coverstitch to finish the armholes and bottom hem. I did not use elastic in the armholes but may go back and redo them with elastic. That slinky is really stretchy!

Would you sew it again? Would you recommend it to others?
I don't think I'd sew it again, but only because there are so many other dress patterns to try.

Conclusion:
Easy and comfortable dress. A great combination!

Thursday, December 09, 2010

Veggie box surprise

Veggie-box surprise

Ingredients:

1 pound of boneless, skinless chicken breasts
1 onion
a few cloves of garlic
most of the vegetables that came in the vegetable box and were destined for the compost bin if they weren't used soon
  (in my case this was: romanesco, carrots, bok choy, and cabbage)

Directions:

Cut everything up
Heat some olive oil  and a little sesame oil in a wok
Add some Chinese 5 spice
Cook the chicken
Remove chicken and cook the veggies
Add the cooked chicken back in
Add soy sauce
Add a little hot chili sauce
Cook some more

Eat.

See, I can cook! Let's just say that cooking is not high on my list of fun things. In an attempt to eat more vegetables and less pizza, I have a vegetable box from farmfreshtoyou.com delivered to the house every other week. It definitely has encouraged me to cook and eat vegetables I might not otherwise try, like bok choy and romanesco. Some weeks I'm better at using them up in more interesting ways but it can be hard when I'm working long hours and dinner becomes whatever I can grab. This week has been one of those bad work weeks so it was time for a veggie-box surprise.

Monday, November 22, 2010

Christmas gifts I made - two years ago

Two years ago, when I wasn't working and had time to sew (that's my excuse anyway), I made some aprons for two of my brothers-in-law. I never shared the pictures because I wanted to wait until after Christmas to post the pictures. But after Christmas I got a job and got busy and well, here they are...two years later.

I chose a music-themed quilting cotton for my brother-in-law who plays the violin in a symphony:

Music-themed apron

This Beatle-themed print, though a bit loud, was for the brother-in-law who likes the Beatles:
Beatles-themed apron

I used McCalls 2233, a great pattern if you want the whole chef ensemble or even if you just need a basic pair of elastic waist pants and a button shirt.

Here's my review of the pattern:

Pattern Description:
Patterns for chef's clothing: chef's jacket, elastic-waist pants, short sleeve shirt, chef's hat, kerchief, and apron.

Pattern Sizing:
Each pattern is single size, but still a good deal considering that you get so much in one envelope.
Did it look like the photo/drawing on the pattern envelope once you were done sewing with it?
Yes.

Were the instructions easy to follow?
Yes, but I did things a bit out of sequence to save on having to jump up and down to use the iron. I suggest you read through all of the instructions first, then fire up your steam iron and press all of the hems at the same time. Also, make the the ties first and iron them flat when you do all the hems. Then you don't need your iron until the end to do a final pressing.

What did you particularly like or dislike about the pattern?
I liked that it was a utilitarian apron in multiple sizes, including XL, that was suitable for a guy. I also liked that the pattern envelope contains so many pieces for other clothing and also included a chef's hat...should I ever need to make one.

Fabric Used:
Cotton quilting fabric, which I bought more for the novelty image than for the utility of the fabric. A heavier cotton would make a more durable apron but it could be difficult to sew through the bulk when sewing on the ties. Even with the thinner quilting fabric, there was a lot of bulk in these areas.

Pattern Alterations or any design changes you made:
Didn't change a thing.

Would you sew it again? Would you recommend it to others?
Absolutely I would sew it again. I think the apron makes a great gift.

Conclusion:
There are lots of apron patterns out there but this one is economical because it includes other clothing pieces. It's also a good choice if you need the XL or XS instead of a one-size-fits all apron.

Saturday, November 06, 2010

A present for me!

Look what I got!

A present for me!
It's not just a purse...

Pretty present for me
It's a purse and a knitting bag!

A new home for my knitting projects

I was able to take a long lunch break today so I slipped out to Bobbins Nest Studio and bought myself a present! I always liked the idea of the Jordana Paige knitting bag/purse but I didn't really like the styles...until now. Her latest design, the L.J. Kaelms, caught my eye and was exactly what I wanted. Since I've been working crazy, crazy hours lately for work, this bag sort of makes up for it. Now if I could only knit while I worked. I could knit and do my work, which is mostly watching stuff and being here in case something happens, but I think my mostly male colleagues would think I was strange (if they don't already) and management would probably think I wasn't working.

Monday, November 01, 2010

Wednesday, October 27, 2010

Great idea!

I'm a fairly novice spinner and therefore have not plied a lot of yarn. For those of you who don't spin, the first stage of spinning fiber produces what's called a single. Twisting two singles together, or plying, makes 2-ply yarn, three singles makes 3-ply, etc. Making 3-ply requires 4 bobbins: 3 for the singles and one for the take-up. I have exactly 4 bobbins for my wheel but one is usually full of practice spinning or another project. Bobbins for my wheel cost $30 each so it doesn't make economic sense to have a large supply of bobbins around. And besides, it'd be too tempting to abandon a spinning project to start another one if I had a lot of extra bobbins. I'd never thought about winding the spun yarn onto something else until I came across this blog post:

Reduce, Reuse, Recycle!

Saturday, October 23, 2010

Rewind

Starting over

One thing I like about knitting is that it's "easy" to start over. I decided I didn't like the way the scarf was looking, and I've learned the hard way that it's probably not best to continue when you're not feeling it. So I don't know what the yarn will be but it's not going to be an this particular infinity scarf.

Wednesday, October 20, 2010

A little satellite knitting

A little satellite knitting

Sorry for the slightly blurry camera-phone picture.

No, I'm not knitting a satellite. I'm knitting during breaks between satellite contacts. I'm helping to operate 6 new Globalstar satellites that were launched earlier today and sometimes there's some downtime. Click here to see the launch (link might only be good for a few days).

This is going to be an infinity scarf. I'm knitting it in Wick soy/polypropylene from Knit One Crochet Two. The yarn feels more like cotton but it's softer.

Saturday, October 16, 2010

Thursday, October 07, 2010

Runway-inspired knitting

From the 2010 Fall RTW (yes, ready to wear) collections:

A bit of fair isle.

D&G - Fall 2010


And if that doesn't suit you, how about a large misshapen poncho that seems to have picked up a few things along the way...worn with antlers.


 Topshop Unique - 2010 Fall

Or just a bobbled and cabled sweater...and really BIG antlers.

Topshop Unique - 2010 Fall

Thursday, September 30, 2010

Keep good records

I'm guessing there are other people out there like me. I have (too many) projects that are partially completed but finishing them now will take a lot more effort because I didn't take good notes. At the time I either didn't think it was important or thought I would remember the details. Yeah, right.

The other day I was going through a stack of traced off patterns and some sewn up muslins, and I had to toss a lot of them because at the time I made them I didn't bother to note the pattern number, size and changes I might have made. Granted, most of these were early projects, and over time I've become much more conscientious of the need to write down all those details when I trace off a pattern. At the time I may think it's unnecessary because I plan to trace off the pattern, make a muslin if needed, and sew the garment up - all within a reasonable amount of time. But in reality I might trace the pattern and then get distracted by a different pattern and shift my attention to it. Or I'll make the muslin and get discouraged at the fit issues and, well, there you go. Months or years later the tissues and muslins are useless, and the initial work is wasted.

I also have a few UFOs that are in the process of construction. Of course I never thought I wouldn't finish those items in a timely manner and didn't think it necessary to note what needle I used, what thread I used, or even take the effort to keep all the pieces and notions together. I admit that reconstructing all this info is partly why I don't finish those projects.

It's even more crucial with my knitting projects that I take good notes. I use a nice Moleskine notebook for this purpose.

Squared Notebook - Pocket

My book is bound at the short edge but for some reason I couldn't find that version on the Moleskine website. I like the Moleskine book because it has a nice, hard cover so it won't get bent up when I toss it in my knitting bag. I record info for current projects, as well as instructions for things like Kitchener stitch, short row toes, sock heels, and variations of cast on/off. The gridded paper is great for recording charted instructions, and there's a little pocket in the back that's useful for storing stray slips of paper. My version doesn't have a bookmark ribbon so I use the elastic strap to mark the page I need. But the absolute best thing this notebook has done for me is help get my knitting back to me. I once left my small knitting bag, containing a sock project, on a Jet Blue airplane. Fortunately a flight attendant found it and looked inside the bag and saw that it was something I'd want to get back. She was able to contact me right away because I'd recorded my name and cell phone on the inside page of my Moleskine book. I never take my knitting anywhere without that book now!

I've found over the years that it's important to record the following things for a knitting project:
  • needle size - that's an obvious one but if you didn't and you borrow the needles for something else, you'll wish you'd recorded it
  • garment size - if I photocopied the instructions I usually circle the size I'm making but I've also lost my photocopy. And sometimes I don't or can't make a photo copy.
  • changes to the pattern - if they're short, like how many stitches I cast on for the first sock or sleeve, I include them here. More complicated stuff gets noted on the photocopied instructions. 
  • cast on method - I finished a sock I'd started after it had sat for many months and when it came time to start the second sock I wasn't sure what cast-on I'd used. Not a big deal but it could make a difference in how the socks wear.
  • again with socks, the type of heel or toe - there are many variations and some are pretty similar.
  • start/end date 
  • pattern name and source - just in case you lose those photo copied instructions! 
  • name of yarn and dye lot - I'll usually record the name of the yarn but haven't ever recorded the dye lot, but I suppose if you lose the ball band and need more yarn it would be helpful to have this info.
  • stitch pattern instructions - if they're short enough I record the stitch pattern instructions. Sometimes it's handier to have the book open instead of my photocopied instructions. I've found that after I while I memorize the stitch pattern but if I've not worked on the project in a while having the instructions jogs my memory.
  • swatch gauge info - you may only get as far as the swatch for a new project and it's helpful to have the needle size and the gauge you got when you eventually come back to it.
I do have a notebook for sewing projects but for me it seems to not really equate to the way I use the notebook for knitting. Though perhaps I should revisit it when I get back into the sewing room.

Tuesday, September 28, 2010

It's been two weeks

...and I'm still hobbling around with my surgical shoe, which is to be expected. Today I'll fill you in on how the surgery and first days of recovery went in case there is anyone out there in internet-land reading this who is contemplating this surgery.

The surgery, which was exactly 2 weeks ago, was about how I expected it to be. It was outpatient surgery, performed at a surgical center. I was instructed not to eat or drink anything after midnight the night before my surgery, which was scheduled for 8:30 am. My birthday was the day before the surgery (and my anniversary the day after - what timing!), so I enjoyed a wonderful birthday dinner, cooked by my fabulous husband, and had a glass of wine. I learned too late that I wasn't supposed to have alcohol the night before (oops!). No harm done though.

I arrived at 7:30 am, as requested, and after a short wait in the lobby was brought into the post/pre-op room. I changed into a gown, paper hair cover, and socks with gripper-feet on them and the nurse set up an IV and took my temperature and blood pressure. My husband was able to come back and sit with me while I waited. The anesthesiologist came to talk to me, asking me what I enjoyed for breakfast. Hah! Trick question! Then he asked the usual questions of prior surgeries and any complications. The post/pre-op room felt a bit crowded but everything seemed well orchestrated. The nurse wrote "yes" in purple marker on the foot that was to be operated on and later my doctor signed his initials on it in purple ink as well.

Eventually I was walked into the operating room and set up on a table. The surgery was performed with "twilight" drugs and a local for my foot. I might have slept in the beginning but was awake later on. I think the drug dosage was spot-on because I was just sort of indifferent toward the whole thing. I'll note that this was probably a better situation than what I experienced during surgery I had years ago where I had to be awake and I felt a bit too euphoric. In that case I was really nervous about being awake during the procedure and they probably overcompensated on the drugs. This time I was just peaceful without being out of it. I could hear the doctors and nurse talking about music - it was just another day in the operating room and another foot to operate on for them. After the surgery the doctor said it went well. I asked how big the neuroma was and he showed it to me in a plastic container. It looked like a glob of white tissue, about half inch or so in size.

The surgery took about 40 minutes. In recovery I started to feel a little pain and was given something in my IV that helped right away. My husband was able to sit with me and that helped a lot. I don't know how long I was in recovery but it wasn't more than an hour until I felt ready to go home.

I've read on line about some people who were up and walking about, driving, and back at work a few days after surgery. Maybe they have a high tolerance for pain, maybe they had no choice due to work or other circumstances, or maybe they were stubborn and didn't want to sit and rest. I was advised to be off of my foot for the rest of the week and fortunately I was able to miss work for that time. Also, my husband happened to be working from home for the week (and the next, and the next) so it was an opportune time for this surgery. While I sat on the couch with my foot elevated on pillows and chilled by an icepack, he cooked and retrieved things for me. Since I couldn't work from home, I watched lots of TV and knitted and knitted and knitted to pass the time. I actually enjoyed the downtime!

The foot was swollen and occasionally throbbed right after the surgery (they make pills for that, thank you very much). It hurt less the first day and more in the days right after, probably as the swelling came down. Two days after surgery I had the dressings changed at the doctor's office. I actually haven't looked at my foot and don't want to for a while. I'm the type who would like to sleep through colds and flu and injuries. Wake me up when I'm better.

I've been wearing the surgical shoe 24/7 - even at night because it keeps my foot from flexing and accidentally getting bumped. It also keeps the cats off of it! My cats like to sleep at the foot of the bed, right where my feet go, and I find that I have to move my feet around their hot, furry bodies. For the first 10 days I slept with my foot elevated on pillows and that kept the cats away. Now that I've done away with the pillows I've noticed the cats are back, so the shoe helps protect my foot.

I'm able to shower by using a blue rubber Dry Pro cover that I pull over the surgical shoe and then I pump out the excess air. It works pretty well, far better and much safer than taping plastic around my foot.

Walking is still a bit of a hobble and I'm not sure if it's because of the surgical shoe or that I can't put weight on the front part of my foot yet. I still try to stay off of it and keep my foot elevated when I can, even if it means hoisting it up on my desk at work when I'm typing on the computer.

I had another appointment for a dressing change last week and have another tomorrow. The doctor said the foot looks good (again, I won't look!) and he thinks I might be out of the shoe this week. We'll see! My foot does still hurt. My 4th and 5th toes have regained some feeling but everything still feels tingly. The upper foot feels constricted and I'm guessing that's due to the bandage. Sometimes I have a pins and needles feeling and sometimes it feels a bit cramped up. The ball of the foot is sore if I put weight on it, which makes me think I'll be sporting this stylish surgical shoe for a bit longer.

Friday, September 24, 2010

Week 2 of foot recovery

So it's been 10 days since the surgery and my foot is slowly healing. I went to work this week, with the help of my wonderful husband who is driving me around. It's nice to have a driver...and a cook. You don't realize how much you need to get around on your feet until you can't. Thank goodness I have my knitting because it's been keeping me sane while I camp out on the couch in the evenings. At work I sit with my leg up on the desk. Not the most ergonomic of positions!

Lovely footwear


I thought I'd share some of my experiences with this recovery in case anyone else does a search on Morton's neuroma and finds my blog. I did lots of searching on line before my surgery and found plenty of people experiencing terrible recovery but I suspect that's the case because people with problems will tend to voice them and not the other way around. My podiatrist has done lots and lots of these surgeries and after talking to him I felt confident to proceed...despite what I'd read on the internet. Yesterday I discovered a coworker had this surgery done on both feet about 20 years ago and she recovered 100%, has no residual pain or numbness and can play tennis with no problems. That made my day!

So a little back story to some questions people might have. How did I get this? How did I know I had it? What did it feel like?

How did I get this? I don't know exactly but it may partly be due to my shoes and perhaps just the way my foot is. Morton's neuroma is a nerve growth that typically occurs between the 3rd and 4th toes and can be caused by wearing narrow shoes, having flat feet or over pronation of the feet. I was never a big shoe person. I didn't cram my feet into uncomfortable or too high shoes for fashion's sake, but I also didn't buy very good shoes. It wasn't until a few years ago that I started to spend more money on good, comfortable shoes. I think I first noticed this pain when I was ice skating, about 6 or 7 years ago. After about an hour on the ice the ball of my foot became sore and I thought it was just from being in hard skates. I also remember having that same pain while walking (and walking and walking) in Rome. I was wearing some fairly well-made shoes (Reiker) but the insoles seemed a little hard in the toe area and I attributed the pain to that...and to all the walking. A few years ago I had more pain in my feet walking around New York City and at this point I decided that maybe my shoes were too narrow. I figured age and the extra weight I'm carrying had caused my feet to spread a bit and the regular medium size was just a bit too tight. Since then I've been buying shoes in wide widths or with roomy toe boxes. But I still had problems. Last spring I was wearing my Reiker shoes, which I don't wear all that often, and the pain in the ball of my foot came back. I bought some insoles and that helped but the pain seemed to stick around even in other shoes.

What did it feel like? Originally it just felt sore on the ball of my foot. Sometimes I could feel a sort of twang that was definitely a nerve - a lot like when you hit your funny bone. Interestingly I didn't really have numb toes; however, the little toe on my other foot does get numb and I remember it getting numb even way back in high school when I wore a particular pair of boots. Turn out I do have a smaller neuroma in that foot.

How did I know I had Morton's neuroma? The internet. I originally thought maybe the cushion in the balls of my feet was wearing out, but when I searched on line I found that my symptoms matched up with Morton's neuroma. I made an appointment with a podiatrist and he confirmed the diagnosis (without letting him know I consulted Dr. Google - well actually Dr. Bing). He got me custom orthotics to get my feet stabilized and we hoped that the neuroma would shrink. But it didn't.

So I had surgery. I could have had injections of cortisone but that would have been temporary fix and also meant needles. In my foot. Ow. My podiatrist has a lot of experience with this condition and he says he can tell the cases that will ultimately need surgery and mine was one of them. I put off the surgery as long as I could. Normally people with Morton's neuroma feel better when barefoot but I didn't. I think it's because I have a lot of flex in my foot. When I pick up my foot after being flat on the floor, it flexes and crunches the neuroma. Well, it used to...the neuroma is not there anymore so I shouldn't have a problem anymore.

I'll continue the story of the surgery and the recovery another day.

Sunday, September 19, 2010

Off of my feet and knitting

I had foot surgery earlier in the week for a Morton's neuroma. It's a painful growth of nerve tissue that often occurs between the 3rd and 4th toes. I tried wider shoes, then orthotics, but it was not going to go away on its own and my options were cortisone shots, which wear off, or surgery.

foot

Since I had to sit with my foot up, it was a perfect opportunity to knit. Yay for knitting! Last month in my knitting guild group I learned how to do the Norwegian purl, which is a continental style of purl stitch, and I really liked it. When I learned to knit I learned left-handed English style but I've been wanting to change to left-handed continental style. Now seemed like a perfect time to do it. I decided the perfect project for this was some ribbed hats for my "Hats for the Homeless" project.

 Last year I asked some knitting friends to help me make some simple hats that I could send to the Southwest Chicago PADS organization, which my in-laws are involved with. I chose the Pro Bono hat  by Angelina Fagan (instructions are here) because it's a simple 2x2 rib and it uses thick yarn so it knits up quickly. Last year I made and collected about 15 or so hats and this year I hope to make and collect more.

This week I knitted up two hats and am almost finished with a third. The pattern turned out to be a perfect project for learning a new way of knitting because I was able to practice both knit and purl in continental. I used some worsted weight yarn (doubled) that my in-laws sent me. I'm not sure where they got it but it was probably from an estate sale, thrift shop or was destined for the trash. I suspect it was someone's old fair isle project since there were numerous hanks of wool in 5-6 different colors. Judging from the tags on some of the skeins, I think the yarn was from the 70's. No bugs on it, but I had to wash some of it and some had to be discarded due to staining that wouldn't wash out. But I'm glad I was able to salvage it and repurpose it for these hats.

hats

Friday, August 20, 2010

Now we landscape

Now that the inside is finished (I know, I promised pictures), we can move to fixing up the outside. Our landscape "plan" was evolutionary over the 12 1/2 years we've lived in this house. Some things worked, some did not. Many of the things that worked became overgrown. I learned the hard way to NEVER use Roundup on the dandelions in your yard - it looked like a dog visited and peed in selective spots. Then during the bathroom renovations the tile guys set up shop on the front lawn and it just went downhill from there. Oh yeah, one last blow...Mr. Gopher came to visit. But thanks to a hardworking landscaping crew, our yard will be transformed and our neighbor two doors down will no longer feel compelled to share "helpful" gardening hints when he's out walking his dog (he paid big bucks to have his front lawn redone).

Anyway, here are some pictures of the work in progress:


Big yard waste pickup next week.


The landscapers were really good. They removed all the weeds but left the good plants that were buried beneath them. These are Gerbera daisies (my favorite flower).


More evidence of the thorough weeding. They left all the good plants, even reducing the overgrown Agapanthus to a more normal size.


Some transplanted Agapanthus in a new location. This is some of the new irrigation line. In the past we used the black drip line most DIYers use because that's what they sell in the big box DIY stores. But it didn't work all that well and we killed a lot of plants as a result. Plus every year we had to fix "geysers" when the pieces broke due to being trampled on or becoming brittle due to the exposure to the sun. Hopefully we'll be able to keep things alive with this system, which is a simple soaker line.


Here's how it will work around the trees. This section of the yard will be mulched.


The backyard is getting some improvement as well. We laid this brick patio years ago but the edge bricks were not secured in concrete and they soon began to tilt. I'm happy we're getting this fixed because I always felt like I was going to tumble into the pond.


Monday, August 09, 2010

Back from NZ

I went to New Zealand last month for about 10 days. It was a fun trip despite it being winter there right now, which meant cold, rain, wind, and a late sunrise and early sunset. It wasn't the first time I've visited there and hopefully it won't be the last. Fortunately the nasty weather let up and we had some beautiful days.

We started the trip in Wellington, where my husband had been working for a month. This was the view out the hotel room.

Wellington NZ

We rented a car in Wellington and drove north to Napier, on the eastern shore of the north island. Napier was demolished in a magnitude 7.8 earthquake in 1931 and the town was rebuilt in the art deco style.

Napier, NZ

Earthquakes and volcanoes tend to go together and New Zealand has both. From Napier we drove inland to the town of Taupo, which is on a huge lake created from one of the world's most violent volcanic eruptions. Fortunately for humans, it happened about 26,500 years ago. Just north of Taupo are some geothermal areas. Credit for this photo goes to my husband.

New Zealand

We ended our journey in Auckland. We took advantage of a beautiful, sunny day to take the ferry over to Devonport, which is where this photo of the Auckland skyline was captured.


New Zealand


New Zealand is of course known for sheep. According to this website there are 12 sheep for every person in New Zealand. So of course I shopped for yarn. I even prepared a list of all the stores to stop at along our route. But just because they have sheep doesn't mean it's a knitter's paradise. Wool production is big business so most of the wool is exported, but there are some NZ made yarns. The real attraction of these NZ yarns is that many are blended with possum. These possum are not the bald possums we have in the US. NZ possums have soft fur, which is used for clothing and accessories because they are non-natural pests that don't belong and kill native birds.

So I helped the New Zealand economy and helped alleviate them of some possum...although not directly off of a roadkill or trapped possum. The clerk in one knitting store described to us in detail how she baits and traps possum in her yard and often gets up in the middle of the night to get the fur once the animal is caught because she said you only have about 4 hours to do so. Nice. I would have loved to have acquired some possum fur for spinning (it must be mixed with other fiber though) but I never came across any for sale. I couldn't even find any wool roving except for a store display, which prompted a pet of course. I did find plenty of merino/possum blend yarn though, which was much easier to get through customs anyway.

New Zealand

I also did a bit of fabric shopping while I was there as well. Within a few hours of arriving, (and after a nice shower and change of clothes) I found myself in Arthur Toye Fabrics in downtown Wellington. I didn't even have this fabric store on my list and literally stumbled across it. Lucky me, they were having a 50% off sale in anticipation of a short move across town. I found two must-have additions to my stash: a beautifully textured cotton/wool plaid and a luscious high end polyester. I hugged my package of fabric tight as I struggled through the horizontal rain and gale-force winds. Welcome to Wellington in winter! Later I picked up a nice piece of cotton/nylon fabric at Fabryx in Taupo. Also in Taupo I bought a selection of fat quarters at Clever Hands, all with a New Zealand theme. Here's the entire haul:

New Zealand

Here I am in Devonport. Note what is behind my right shoulder and part of the reason I'm smiling. The other part is of course that I'm looking at my wonderful husband who was so patient and accommodating of my mission to seek out the yarn and fabric stores on our vacation...and buy more yarn and fabric for my stash.

New Zealand

There definitely are knitters in Devonport. We spied these two works of knitting graffiti:

New Zealand


New Zealand


I'll try to post more pictures and maybe a video or two, mostly of sheep out the window of the car as we drove.

Friday, July 16, 2010

Magazine overload


I have to do something difficult. No, I'm not getting rid of these Threads magazines (yet), but I am going to let my renewal pass by. It's not that I don't enjoy the magazine because I do. I just don't have room to keep collecting them, and frankly, I don't have time to thoroughly read them either. When the magazine arrives I flip through it and I see the helpful articles on sewing techniques, but I don't read them. I expect that I will someday go back to these magazines when I need sewing help and on a few occasions I have. But I'm also just as likely to reach for one of the many sewing books I own. Tauton Press put out a Threads DVD archive, which I bought, and perhaps they'll continue to make DVDs on a yearly or multi-year basis. With e-books and iPads and the like, maybe we're heading toward paperless books and magazines as the norm. Could be interesting. I'm not ready to find a new home for all of my old Threads issues or toss them in the recycle bin so in the meantime they take up room. And that's mainly the reason why I need to stop the flow of magazines coming into the house. It's not just Threads that I collect. All these magazines are starting to overwhelm me.


These are some of the knitting magazines, which I no longer subscribe to. If there's a magazine for sewing, knitting, spinning, weaving, machine embroidery...I probably have at least one copy. Often I just buy the single copies but I've had subscriptions to many of them. Then there are the foreign magazines and don't even get me started on the pattern magazines. My bookshelf is stuffed with ten years of Burda plus a smattering of Diana Couture, Elena Couture, La Mia Boutique, Patrones, Knipmode...

I also have a large collection of Martha Stewart Living magazines, which is boxed up because I don't have the bookshelf space. That's another magazine I stopped subscribing to.

So my magazine subscription is now down to only two: Burda and Elle. I might stop Elle in favor of a different fashion magazine. I like to mix it up and try different ones. At least I don't hold on to the fashion mags - I tear out pictures that interest me and put them into a inspiration book...when I get around to it.

*********************************************************************************

We have four cats in our house but only one of them seems to make the blog on a regular basis: Felix. Today he took advantage of an open pantry and foraged for his own food. Apparently it's much more fun and interesting to tear into the bag instead of just eating the very same food out of his bowl. He works hard for that food too - meowing, rubbing, reaching up to the counter...but I guess it's better straight out of the bag.


*********************************************************************************


And finally...


The deck is about  95% done - just a few steps left and some sealing and then it'll be ready to enjoy.

Friday, July 09, 2010

Shower cat

Felix decided to take a bath in the shower.


He likes to roll around and show off his white belly. Action shot!


Taking a break during his manic "wash-fest"


And in other news...the deck is coming along:

Thursday, July 08, 2010

Fabric delivery

It's been 3 years since my last fabric.com purchase.

You can read that statement as if I were in a fabric-aholic meeting (if there was such a thing!) or as a confession, even though I'm not Catholic. Between 1999 and 2003 I had what I would consider to be an addiction to online fabric buying. Boxes from fabric.com arrived almost monthly, sometimes more often. Fabric.com has a record of my orders and apparently October 2002 was a good month for them as I placed 6 orders. Oh my. I started buying from them when they were Phoenix Textiles and I was enticed by their super cheap fabrics to practice my sewing. They were $1.99 or maybe even $.99. If I remember correctly, nothing was over $4/yard (and it was actually 39 inches) in those early years. According to my account at fabric.com, my first order was in September 1999 but it's so old they don't list what I bought. The order number then was only 4 digits - they're up to 7 digits now. I do remember that the fabric I received was nice, too nice I thought, for practice sewing. I bought more. And more. And more. I have sewn some of it and some of it has left the house in one way or another through trades with sewing friends or gifted to my sister. Most of it is stored away in plastic bins along with fabric from EmmaOneSock, Denver Fabrics, Textile Fabrics, Gorgeous Fabrics, Fabric Club, and a few more. Not to mention fabric bought in "brick and mortar" stores. And then there's the travel fabric. Oh my.

I love fabric. I love the texture, the color, even the smell. I enjoy imagining what I would do with the fabric. The problem is that lately I've only done the dreaming part. Knowing that I possess more fabric than I can possibly sew, I have curtailed my fabric shopping to almost nothing over the last few years. I allowed myself to buy fabric on vacations as a sort of souvenir, and of course I couldn't pass up fabric shopping in New York City. Lately I've been making home dec fabric purchases since we need curtains and pillows and such for the rooms that we've redone. And one of those rooms, my sewing room #2, as I call it, is close to finished. All that remains is to finish moving stuff back in, organize...and make some window treatments, pillows, and bedding with the fabric I bought.

I guess buying the home dec fabric was like an alcoholic taking a sip after years of sobriety. I fell off the wagon. The cat is out of the bag. I stopped ignoring the emails from fabric.com.

So 11 years after my first fabric.com purchase, I've again experienced the little flutter of happiness upon receiving a big box of fabric.


Well, not much fabric actually. The pillows required the box to be large. The chenille and cording is for a pillow. The rocket fabric is for me, for a kitchy shirt to wear when I work on satellite launches.


But it is a slippery slope. After making that online purchase I have "sinned" again. I happened to be at Joann's to buy a curtain rod and I couldn't resist two pieces of sale fabric. And I've been looking at other online fabric sites and dreaming about the fabric and what I can make with it. Hopefully I will find the restraint because I already have a lot of wonderful fabric that should be used and not packed away in plastic bins.

But I really did enjoy the thrill of new fabric!

Monday, July 05, 2010

Tour de Fleece

Some of my spinning friends have joined a challenge to spin during the Tour de France. I thought I'd give it a go for a little bit; however, I can't spin and watch the race, so I don't think I'll be doing to much tour de fleece. But here's a look at what I'm working on:


Here's a look at some of the plied result:

Monday, June 28, 2010

Reveal #1, without furniture

The guest room is finished. It's empty and ready for furniture...and stuff. I thought I'd take some pictures before it gets filled up.

But first, a "before" picture. However, I didn't take one before the demolition and I couldn't find any good photos of the room before we redid it. The best one I could come up with was one I took of a purse and skirt I made...with a bonus action shot of Felix about to jump up on top of a cabinet. There's not much to say about it really. The room was mint-green and had one window. And it had wood floors, but they were in pretty bad shape and there was water damage in the middle of the room (waterbed?).


We changed the window to French doors and added a window on the right wall. The paint color is a light purple-gray - Lowes Olympic paint "Bad Lands", to be specific. My husband refinished floors. We also added the ceiling light and added and moved some wall outlets. Ok, to be clear, the contractor did the electrical and put in the door and window and we had a drywall guy redo the walls. Although we're capable of doing the work, we just don't have the time anymore. I did get out the drywall mud and patch the inside of the closet though! I'm pretty good with the hawk (it's a flat surface with a handle that you use for holding the mud while you use a putty knife to apply it). And I also painted.


I designed the closet shelves and our contractor built them. I included a pull-out ironing board, which was expensive, but worth it I think. The closet doors are 3 sliding doors. The outermost one, which is visible here, will eventually have a tack-board mounted on it.


Here's a view of the closet doors closed. Two of the doors have mirrors on them.


Since I'm showing pictures, I should also show off the hall bathroom, which we also redid. This is actually the second re-do, although the first was only partial. About 10 years ago (wow, has it been that long?) we painted and changed out the vanity, sink and mirror. At the time I was into a beachy look so we painted the walls a sea-green and I added a little bit of decorative fish. Here is the before:


We didn't redo the bathtub at that time, which was a one-piece vinyl surround.


And here's how it looks now! The entire room was gutted and we had a skylight put in. I designed everything, from the tile layout to the vanity, which our contractor made for us out of walnut.


Here's a closeup of the vanity...and yes, there is a knob missing. Actually three knobs are missing. Some of them were damaged and I had to reorder and just haven't gotten around to putting them on. Originally we were going to have a Caesarstone counter but the walnut was so beautiful I didn't want to cover it up.


The bathtub is an airjet and it makes lots of bubbles.


I should also share photos of the master bedroom and bathroom, which have long been finished but I'll save that for another time.