Wednesday, June 17, 2009
Saturday, June 13, 2009
Flew the coop
Friday, June 12, 2009
Location, location, location

Even though I know the male takes over for stretches of the incubating period, I'll just refer to the bird as "her." It's hard not to startle her since she's so close to the house and we need to move about the patio to tend to the pond and take out the compost. She pretty much stays quietly sitting on the two little white eggs, peering out with tiny black eyes. Last weekend I forgot about our feathered visitor and took my laptop out to the patio to do some work. She was stayed motionless in her nest while I worked at the table (off to the right in the above picture) but when my husband came around the side of the house to talk to me, we both forgot about her and eventually she lost her nerve and flew off. I am concerned for her eggs because she didn't return for half an hour. But she's back. I took the above picture this morning and she (or he) is there in the white pot on the left, pretty well hidden among the chives.
This is likely her second attempt this season. A Mourning Dove laid two eggs last month but one day both the doves and the eggs vanished. Since we never saw any babies nor was there any evidence that anything hatched, I'm afraid the eggs became breakfast for a squirrel.
The renovations on our own "nest" continue. Our contractor built us a window seat and bookshelves for the bedroom and installed them yesterday. I am really pleased with them. I'm also glad I made the last minute decision to lower the window seat height from the height of the window sill to 19 inches. There is some finishing work to be done, like trim and paint (white) and installation of the shelves, but here's a photo of the progress:
Thursday, June 11, 2009
How we spent last weekend
Refinishing your own floors isn't that hard to do, it's just tedious. You need to rent a floor sander and use a hand sander for the edges. Ear protection is a must as the sanders are very noisy. You should also wear a respirator or at the very least a mask because the wood dust is very fine. We rented the floor sander from the hardware store (Orchard Supply, or "OSH" for those of you in northern California). In the past we've rented floor sanders from that "orange" big box home improvement center and found them to be pretty beat up. Plus, the last time we rented one from them we saw they'd removed the skirt at the bottom that helps keep the dust contained (all of the sanders had it removed, why we don't know). Without that skirt there was A LOT of wood dust. I had to constantly use the shop vac while my husband ran the sander. The sander we rented from OSH is an orbital sander from Varathane and it works pretty well to sand and vacuum at the same time. It's really easy to push and you just have to move it around the floor...back and forth, back and forth. It takes a while and uses up lots of heavy grit sandpaper to get through the tough varnish, especially the oil-based stuff they used in the late 60's when our house was built. But eventually you can switch to a finer grit sandpaper and then finish it off with the finest grit. The next step is staining and varnishing. We use water-based polyurethane and put on about 4-5 coats.
Friday, May 15, 2009
Monkey business!

Wednesday, May 13, 2009
Mysterious Mosaics
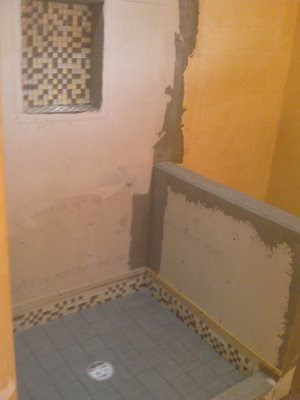
Here's another picture of the tiles (now showing the completed wall) and you can probably see lots of zig-zags - or at least I can:
But click on the above picture to see a larger view (really large!) and the patterns made by the dark tiles are not as obvious. But trust me, in real life you have to work hard to see them.
Since neither I nor my husband was home to see the actual tile, we were relying on the cell phone picture of the tile. The message to fix the tile was routed through our contractor and then to the tile guy. When the tile guy looked at the tile, I'm sure he thought we were nuts, but he moved a few of the small tiles anyway. He asked his assistant to take a picture to send to the contractor but when the assistant prepared to take the picture he got a screwy look on his face as he looked from the camera to the tile and back again. Now they saw what we saw!
So mystery solved. The tile is just fine and we've all learned that pictures can lie, especially when it's a picture of glass mosaic tile!
Tuesday, May 12, 2009
Update on the house
Bathroom floor, looking in from the doorway:

Shower floor (those are temporary wood strips just above the strip of mosaic):
The shower as of this morning:
This one shows how wide the mosaic border is. The white tile will continue above the mosaics to the ceiling:
It's been a more labor intensive tiling job than the "tile guy" first thought. But he is doing an absolutely beautiful job. I'll probably be taking longer showers just to admire the tile. I am sure his other construction work is just as well done, so I highly recommend Dastrup Construction.
I finished writing this post and was about to publish it when I saw something in the above picture that made my heart just sink. Do you see it? The mosaic tiles above the inset shelf are not very random, in fact they are down right regular...in a ziggedy zaggedy way. I tried not to see it. I thought maybe I was just noticing it because of the lighting. Mosaic tile comes pre-arranged in sheets so it's not the tilers fault. They certainly didn't lay the individual tiles that way. Somehow the sheets, which are 12x12, must have come that way. But I knew it was speak now or forever live with the tile because tomorrow they're going to grout. The tile guys now see the issue and they're fixing it. Crisis averted.
The other projects are progressing. The bedroom drywall is up and after the tiling is finished, the drywaller will come back to tape, mud, and smooth out the joints. There are eight 4" diameter recessed lights in the ceiling (yay - light!) and the contractor repositioned electrical outlets so they are more accessible and added one more. The ceiling fan box is also wired. This is the fan we're thinking of getting. It will have maple blades and a brushed nickel housing:
(picture from Modern Fan Company)
 The contractor is also building our custom bathroom vanity. It will be maple with brushed steel cylindrical feet and stainless steel drawer pulls. We're still mulling over the idea of a stainless vanity sink. But I hear from those who have stainless bathroom sinks that while they look great when clean, they dirty easily with toothpaste, water spots, and finger prints. A basic white sink hides a lot of those messes.
The front of the house (where this whole project first started) is also almost finished. The front doors are being stained and will be installed once the interior workmen are finished going in and out so we can minimize wear and tear on the new door.
So it looks like a few more weeks to go. I think we (as in me and the husband) will be refinishing the floors, putting in closet organizers, painting, and installing the light fixtures and ceiling fan. All things we've done before. We've also done tiling, drywall, and electrical ourselves but it's been good to pay someone else to do these things this time, especially after seeing how difficult the tiling is.


