One thing I learned from this project is that I think I prefer sewing with knits. I just finished the Burda WOF skirt and it seemed to take forever! There was the zippered fly, 5 button holes, finishing all the seam allowances, topstitching, pressing, hand-sewing the hem...And this was just a skirt!
I'm proud of this skirt and hope to get a lot of wear out of it.
Here's my review of the pattern:
Pattern Description:
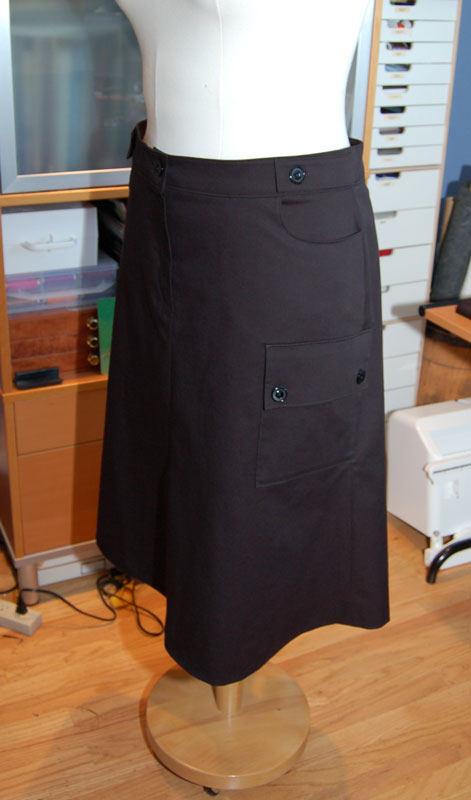
Skirt with hip-pockets, one patch pocket, button tabs, zipper fly, and inverted box pleat in the back. The pattern includes instructions for a lining.
Pattern Sizing:
36-44. I drafted up to a 46 and altered further on a muslin.
Did it look like the photo/drawing on the pattern envelope once you were done sewing with it?
Yes! One of the things I like about Burda is the extra design details they put into their patterns. The patch pocket, tabs and back pleat make this more than a plain skirt, so I definitely wanted to include them. Here's a view of the back of the skirt, so you can see the pleat.
Were the instructions easy to follow?
Fortunately this skirt was the featured sewing lesson pattern in the 9/06 Burda WOF issue, so there were detailed instructions and illustrations. This was a very good thing because I can count on one hand with a few fingers missing how many zippered flies I've done. I still needed to consult the pants in my closet to see what's supposed to line up with the waistband. The rest of the skirt went together easily, it just took me a lot of time.
I did notice a few minor errors in the instructions, like one illustration shows the pocket on the right side instead of left and there's one measurement conversion from metric to English that's wrong (the dimension for the tabs), but otherwise the instructions were easy to follow and not too confusing to me. The instructions were very detailed, down to telling you when to "neaten" the seam allowances. They don't tell you what size buttons to use and hence how big to make the button holes. I used 3/4" buttons in all locations and made 20 mm buttonholes.
I ran into a few problems during construction but I think they were all my own errors. When I translated the dimensions of the rectangular pieces and drew up pattern pieces, I failed to mark the direction on the pattern piece. I also forgot to add the hem dimension to the back pleat and instead only added the seam allowance to the bottom. As a result I ended up having to recut two pieces but fortunately I had enough extra fabric.
There may be an error in the waistband pattern. I ended up with the front waistband pieces a full 1 inch too small, which may have been an error in my initial drafting, but do check if you're going to make this skirt. I had just enough fabric to recut them. Whew. As with nearly every sewing project, I learned something. The lesson learned this time was to check the pattern before you sew. If I'd compared the waistband piece to the front skirt piece, I would have caught the error earlier. This tip is in fact one of the articles in the Fall 2007 Sew Stylish magazine. The article, "Not All Patterns are Perfect" describes a few things to check before you cut. I didn't get the magazine in time to help me with my mistake but now it is further entrenched in my mind to check the pattern pieces first!
What did you particularly like or dislike about the pattern?
Besides the extra designs details I already mentioned, I picked this skirt because it was casual looking with a bit more width at the bottom of the skirt and also it was not too long. There is a bit of shaping through the hips as well, which is good for a curvier person like myself.
Fabric Used:
A black cotton twill with a bit of lycra in it. The lycra is not necessary for this pattern but it was what I had and was from my stash.
Pattern Alterations or any design changes you made:
I did not make the lining. The skirt in the magazine is out of wool so a lining would make sense but I made mine out of cotton and didn't need one. I used a serger to finish the seam allowances and pinked the seam allowances on the two hip-pockets. Actually I forget to finish the pocket seam allowances during construction and feared catching the skirt in the knife blade if I tried serging them with all the bulk of the skirt in the way, so I used my pinking shears. I now think that pinking was probably a better way to finish them because the serged edge might leave a bumpy outline of the pocket on the front of the skirt.
I made alterations to make the skirt fit me. I sized up from a 44 to a 46, then made a muslin and made further adjustments to the hips (out) and waist (in).
Would you sew it again?
I will definitely sew it again.
Conclusion
I love the details of this skirt. I also feel a sense of accomplishment with it having done the zippered fly, the patch pocket, and the waistband - all details I don't have much experience sewing.
I said at the beginning of this post that I think I prefer sewing with knits. Of course having a very nice serger that does coverstitch helps with that. To me, knits are easier to sew and more forgiving in fit, than wovens. I recently searched through my stash for some woven fabric for a jacket and was surprised to see how many knits I have. I remember when I first learned to sew, it was hard to find good knits in the fabric store. Most patterns were designed for wovens too and I still find that the majority of the Big 4 patterns are for wovens. I can understand that since sewing knits on a sewing machine can be tough. Thankfully today we have home sergers and the availability of good knits via the internet (although the chain fabric stores and independents sometimes have some good selections).
So my PWAP is now 50% done. I haven't posted pictures of the first skirt and top because I want to retake the picture, which will mean putting them back on the dress form.
Fortunately the remaining PWAP items are knits! I already started tracing the Burda top from 11/06. I'm pretty sure I'll have to give up on my crazy notion of sewing that Butterick jacket before we go. There is just not enough time. The Geisha jacket in the thermal knit (if I get it done!) should work well and I'll decide on either the leather or suede RTW jackets I have in my closet.
I love it! The pocket detail on this skirt really makes the look.
ReplyDeleteNice skirt! You did a great job, and I love the style!
ReplyDeleteVery well done, Lori!!
ReplyDeleteWow, 50% done -- congrats! The skirt is so cute and will be great for Paris.
ReplyDelete